Ever found yourself with a leaky toilet and wondered what to do next?
Typically, fixing a leaky toilet is a job for a plumber, but if you’re handy-dandy or short on cash, you may be able to tackle the job DIY.
The toilet’s wax ring is a prime suspect for a leak at the base. This innocuous little seal keeps water from seeping out of your toilet and onto your floors. When it fails, you’ll know — and so will everyone else in the house!
Replacing a toilet wax ring isn’t complicated or technically challenging, but it can be gross and physically demanding. So let’s not think about it too much.
What’s a Toilet Wax Ring?
A toilet wax ring is a donut-shaped seal made from wax or a wax-like material. It sits between the toilet outlet and the flange on the floor, providing a watertight seal. This humble wax is crucial in keeping your bathroom dry and odor-free.
Why Replace It?
Over time, the wax ring can degrade, become damaged, or lose its seal due to movement, age, or improper installation. When this happens, you’ll likely notice water seeping from under the toilet base or unpleasant odors emanating from the bathroom.
Replacing the wax ring renews the seal and prevents further damage to your flooring and subflooring.
Step 1: Gather Your Materials
Start by collecting all the materials and tools for this project. You don’t want to be midway through only to realize you’re missing something vital.
You’ll need:
- A new wax ring (make sure it fits your toilet — they come in different sizes)
- Adjustable wrench
- Disposable gloves
- New toilet bolts (optional but recommended)
- Plumber’s putty (optional)
- Putty knife
- Sponge or bucket
- Old towels or rags
- Plastic scraper
- Plastic bag
Step-by-Step Guide to Replacing a Toilet Wax Ring
1: Shut Off the Water Supply
- You’ll typically find the shut-off valve behind the toilet. Turn it clockwise until it stops.
- Flush the toilet to drain as much water as possible from the tank and bowl.
- Use a sponge or bucket to remove any remaining water from the tank and bowl to avoid any mess.
2: Disconnect the Water Supply Line
Disconnect the water supply line from the bottom of the toilet tank. A small amount of water will drip out, so have towels or rags ready to catch it.
3: Remove the Toilet
- Unscrew the nuts from the bolts at the base of the toilet.
- If the bolts are old or corroded, you might need a penetrating oil to loosen them.
- Once the nuts are removed, gently rock the toilet back and forth to break the seal of the old wax ring.
- Lift the toilet straight up and place it on an old towel or rag to protect your floor.
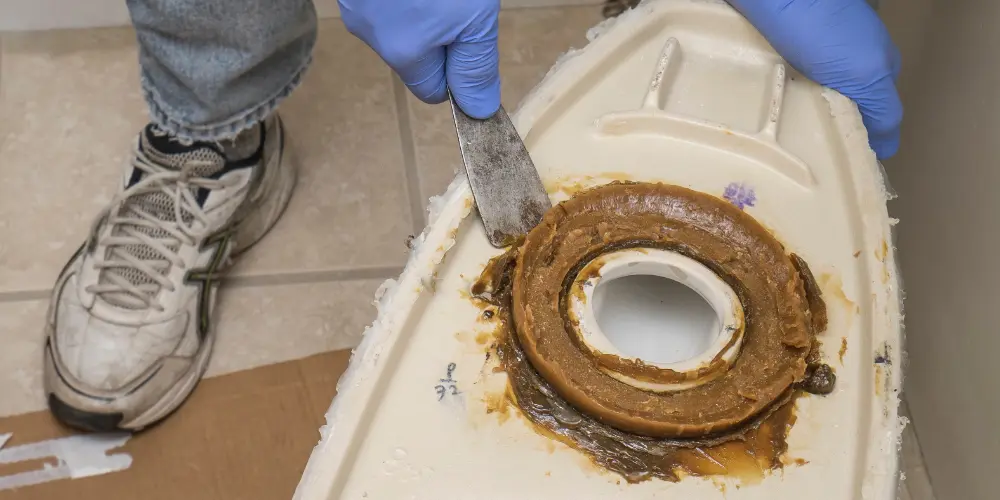
4: Remove the Old Wax Ring
- Put on your disposable gloves.
- Use your putty knife to scrape off the old wax ring from the toilet flange and the bottom of the toilet.
- Be thorough; any leftover wax can interfere with the new seal.
- Place the old wax ring in a plastic bag for disposal.
5: Inspect and Prepare the Flange
- With the old wax ring removed, take a moment to inspect the toilet flange.
- Look for any cracks, damage, or corrosion. If the flange is in poor condition, you might need to repair or replace it before proceeding.
- Clean the flange area thoroughly to ensure a smooth surface for the new wax ring.
6: Install the New Wax Ring
- Place the new wax ring on the flange, ensuring it’s centered.
- If your replacement ring has a plastic flange, position it so the flange faces down into the drainpipe.
- Some plumbers prefer to place the wax ring on the toilet outlet instead of the flange. Either method works as long as it stays centered during installation.
7: Reinstall the Toilet
- Carefully lift the toilet and align the bolt holes with the flange bolts.
- Lower the toilet straight down, allowing the wax ring to compress and create a seal.
- Avoid twisting or rocking the toilet, which can compromise the seal.
- Press down firmly to ensure the toilet is seated correctly.
8: Secure the Toilet
- Reattach the nuts to the flange bolts and tighten them evenly using your wrench.
- Do not overtighten, as this can crack the toilet base or flange.
- Once the toilet feels stable, gently wiggle it to verify it doesn’t move.
9: Reconnect the Water Supply Line
- Reconnect the water supply line to the bottom of the toilet tank.
- Tighten the connection with your wrench, but avoid overtightening.
- Turn the water supply valve back on and allow the tank to fill.
- Check for leaks around the toilet’s base and the water supply line connection.
10: Test the Seal
- Once the tank is full, flush the toilet a few times to test the seal.
- Check around the base for signs of water leakage.
- If everything is dry, congratulations — you’ve successfully replaced your toilet wax ring!
FAQs: Replacing a Toilet Wax Ring
Q: How often should I replace a toilet wax ring?
Under normal conditions, a toilet wax ring can last several years, even decades. However, if you notice leaks or odors or if installing a new toilet, it’s a good idea to replace the wax ring.
Q: Can I use a wax-free seal instead?
Wax-free seals can be a good alternative, especially if you live in a warmer climate where wax rings might melt or deform. They’re also easier to install and less messy.
Q: What if my toilet still leaks after replacing the wax ring?
Double-check that the toilet is properly aligned and the bolts are tight. If the problem persists, the flange might be damaged, or there could be another issue with the plumbing that needs professional attention.
Q: Can I replace the wax ring myself, or should I hire a plumber?
Most homeowners can replace a toilet wax ring with basic tools and a bit of patience. However, if you’re uncomfortable with the process or encounter any issues, don’t hesitate to call a plumber.
Q: How can I avoid damaging the toilet or flange when replacing the wax ring?
Be gentle when removing and reinstalling the toilet. If the bolts are corroded, use penetrating oil, and avoid overtightening the nuts when securing the toilet. If you notice cracks or signs of damage to the flange during the process, address these issues immediately before proceeding.
Q: Is it necessary to use new toilet bolts during installation?
While not strictly necessary, using new toilet bolts is highly recommended. Old bolts can be corroded and may not provide a secure fit for the new installation. New bolts typically come with a wax ring kit and ensure a better, more stable seal for your toilet.
Q: What should I do if the toilet flange is damaged?
If the toilet flange is cracked, broken, or corroded, you’ll need to repair or replace it before installing the new wax ring. Flange repair kits are available at most hardware stores and offer a straightforward solution for minor damage. For severe issues, you may need to replace the flange.
Q: Are there any signs that indicate a failing wax ring?
Common signs of a failing wax ring include water pooling around the toilet’s base, unpleasant bathroom odors, and visible gaps between the toilet and the floor. If you notice any of these things, inspect the wax ring and replace it if necessary.
