Is your toilet leaking at the base?
You may have a cracked toilet base, loose or corroded mounting bolts, or a deteriorated wax ring. Or it could be the flange that connects the toilet to the drainpipe. When the seal between the toilet and flange breaks, water can seep out each time you flush the toilet.
It’s an unpleasant, unsanitary, and potentially dangerous situation, and you should address it ASAP. But what if you can’t afford or find a plumber? Or what if you pride yourself on your handiness?
Replacing a flange is a relatively simple though grubby repair that you may be able to perform on a Saturday morning.
In this guide, we’ll walk you through the steps.
NOTE: Replace the toilet flange DIY only if you’re confident in your abilities and willing to assume all risks.
What’s a Toilet Flange?
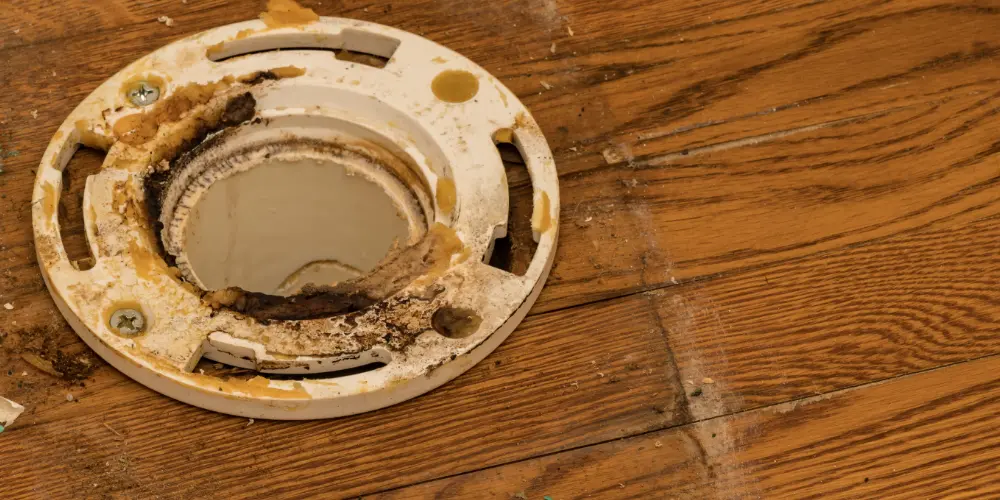
A toilet flange serves as the interface between the bottom of the toilet and the drainage pipe. Typically made from PVC, rubber, cast iron, or metal, it provides a secure mounting point to anchor the toilet to the floor and ensures a watertight connection.
The flange features a ring with bolt slots to secure the toilet and a sleeve that fits into the drain pipe. When installed correctly, it maintains a sanitary and odor-free bathroom by directing waste and water efficiently into the sewage system.
What Happens When a Toilet Flange Is Installed Incorrectly?
An incorrectly installed toilet flange can lead to several problems.
- Water leakage every time the toilet is flushed, which can damage your floor, subfloor, and even the ceiling below.
- Unpleasant odors due to sewage gas escaping into your home.
- Mold and mildew growth, compromising indoor air quality.
- Toilet instability — rocking or moving — breaking the wax seal or further damaging the flange.
Symptoms of a Bad Toilet Flange
Common indicators of flange problems include:
- Water Leaking at the Base: Water pooling around the toilet base after flushing is a telltale sign that your flange needs replacing, especially if the water is dirty.
- Unstable Toilet: A rocking or moving toilet may have a damaged flange.
- Foul Odors: Sewage gas smells like rotten eggs, and if you smell it in your bathroom, you likely have a broken seal around your toilet.
- Visible Damage: Cracks or corrosion on your flange indicate it’s time for a replacement.
Tools and Materials You’ll Need
- Putty knife
- Adjustable wrench
- Hacksaw or reciprocating saw
- Screwdriver
- Flange repair kit (includes a new flange, bolts, and wax ring)
The following items are helpful but not required:
- Closet bolts: These will secure the toilet to the new flange.
- Wax ring extender or extra-thick wax ring: If your new flange is slightly below the floor level after installation, using an extender or thicker wax ring creates a proper seal.
- Rubber gloves: To keep your hands clean, as toilet repairs can get messy.
- Old towels or rags: Handy for wiping up water or stuffing into the drainpipe to prevent sewer gases from entering the home while the flange is off.
- Level: To ensure your toilet sits flat and even after the flange replacement.
- Silicone caulk: After flange installation, you should caulk around the toilet base for a finished look and to prevent water escaping.
- Penetrating oil: This can help loosen rusted or stuck bolts.
Step-by-Step Guide to Flange Replacement
1. Remove the Toilet Bowl
- Turn off the water supply and flush the toilet to empty the tank.
- Use a wrench to disconnect the water supply line.
- Carefully remove the toilet bowl.
2. Clear the Old Wax Ring
- Use a putty knife to scrape the old wax ring from the flange and bottom of the toilet.
- Ensure a clean and smooth surface for the new wax ring.
3. Detach the Damaged Flange
- Inspect the flange for any visible damage.
- Use a wrench to loosen and remove the bolts securing the flange to the floor.
- Lift the damaged flange away, exposing the waste pipe.
4. Select the Right Replacement Flange
- Choose a replacement flange that matches the type and size of your old flange.
- Ensure it is made of durable material and has the correct specifications for your toilet.
Preparing the Area
5. Clean the Exposed Floor Area
- Thoroughly clean the exposed floor area around the waste pipe.
- Remove any debris or remnants from the old flange.
6. Assess Subfloor Damage
- Take this opportunity to inspect the subfloor for any signs of water damage.
- Addressing subfloor issues now can prevent future problems with your toilet installation.
Installing the New Toilet Flange
7. Proper Alignment & Positioning
- Carefully align the new flange over the sewer pipe so that it sits flush with the floor.
- Use the bolt slots to position it correctly.
8. Secure the Flange to the Floor
- Insert new bolts through the flange and secure them to the floor.
- Use a wrench to tighten the bolts for a snug fit.
9. Connect to the Waste Pipe
- Make a clean cut to the waste pipe, if needed, using a hacksaw.
- Attach the new flange securely to the waste pipe, creating a tight seal.
Reattaching the Toilet Bowl
10. Replace the Wax Ring
- Set a new wax ring onto the flange, centering it over the waste pipe.
- The wax ring creates a watertight seal between the toilet bowl and the flange.
11. Align & Secure the Toilet Bowl
- Carefully lower the toilet bowl onto the new wax ring, aligning it with the bolts on the flange.
- Gently press down to secure the bowl, then tighten the bolts with a wrench.
12. Reconnect the Water Supply
- Reattach the water supply line to the toilet tank and turn on the water supply.
- Flush the toilet to ensure proper water flow and check for leaks.
Tips & Tricks for a Successful DIY Replacement
Ensuring a Tight Seal
Achieving a tight seal is paramount for a leak-free toilet. Take extra care when aligning the wax ring and securing the toilet bowl to prevent gaps.
Preventing Future Damage
Regularly inspect your toilet flange for signs of wear and tear. Addressing minor issues promptly can prevent significant damage and extend the lifespan of your toilet installation.
Common Mistakes to Avoid
Avoid common mistakes like over-tightening bolts, using the wrong size flange, or neglecting to check for subfloor damage. Failure to address these mistakes can impact the long-term performance of your toilet. A rushed, careless replacement invites instability, leaks, and frequent repairs.
When to Seek Professional Help
While this guide gives you the basics to replace a toilet flange, some situations require professional help.
These include:
- Complex Plumbing Systems: A professional should handle antiquated or customized plumbing systems.
- Extensive Subfloor Damage: When damage to the subfloor is severe or extends beyond the area immediately surrounding the flange.
- Non-standard Flange Sizes or Shapes: If the replacement flange is non-standard size or shape and the existing plumbing must be altered.
- Cast Iron Piping: Replacing flanges on cast iron piping is particularly challenging and may require special tools and techniques.
- Building Code Uncertainty: If you’re unsure about local building codes and requirements for plumbing installations.
- Limited Experience: Improper installation can lead to leaks, water damage, and costly repairs down the line.
If you live in Orange County, CA, and need professional plumbing, please call us at Orange Coast Plumbing. We guarantee our work and are on call 24-7 for emergencies. We have the largest fleet of service trucks in Orange County and can be there at a moment’s notice. 714-953-1111.
Frequently Asked Questions about Toilet Flanges
Q: How often should I replace my toilet flange?
A: It depends on usage and wear. Check for signs of damage annually and replace as needed.
Q: Can I reuse the wax ring during flange replacement?
A: We recommend a new wax ring to ensure a watertight seal.
Q: What if I encounter difficulties aligning the new flange?
Q: Take your time to ensure proper alignment. If issues persist, call for professional assistance.
Q: How do I know if I have subfloor damage during the replacement process?
A: Inspect the subfloor for soft spots, discoloration, or any signs of water damage. If unsure, consult a professional.
Q: Can I replace a flange without removing the toilet?
A: No, you must remove the toilet to access and replace the flange.
Q: What are the signs that a toilet flange needs to be replaced?
A: Common signs include water leaks at the toilet’s base, unpleasant odors, and movement or instability of the toilet bowl.
Q: Are there different types of toilet flanges, and does it matter which one I use?
A: Yes, flanges can be made of PVC, ABS, cast iron, or stainless steel. Use a flange compatible with your plumbing system and toilet model.
