Installing a toilet is a manageable DIY home repair project that typically takes two to three hours. The process involves shutting off the water, removing the old unit, cleaning the floor flange, placing a new wax or silicone ring, setting the new toilet bowl, securing the bolts, attaching the tank, and reconnecting the water line.
You’ll only need a handful of basic tools, which most homeowners already have on hand.
A Can-Do Upgrade
Replacing a toilet might sound like a job best left to the pros, but it’s one of those projects that’s far more doable than it seems. With a couple of hours and a bit of patience, you can swap out an old unit and save yourself a hefty plumbing bill.
Think of it this way: this isn’t complex plumbing—it’s more like careful assembly with a purpose. A few bolts, a proper seal, and good alignment go a long way.
And after you’ve done it once, you’ll never look at a toilet the same way again.
Tools & Materials You Will Need
The first step is to gather all the tools and materials you need before you begin, so you don’t have to run to the hardware store halfway through the project.
Your DIY Checklist
- New toilet (one-piece or bowl + tank)
- Wax ring or silicone seal
- Closet bolts (usually included)
- Adjustable wrench
- Putty knife
- Sponge and bucket (A shop vacuum is helpful, but a sponge and bucket will get the job done just fine.)
- Old towels or rags
- Hacksaw (for stubborn bolts)
- Plumber’s tape (Teflon tape)
- Heavy-duty trash bags
Optional But Helpful
- Toilet shims (for leveling)
- Work gloves
Step-by-Step Toilet Installation Guide
1. Remove the Old Toilet
- Turn off the water supply valve behind the toilet (clockwise). Flush and hold the handle down to empty as much water as possible. Use a sponge to remove what’s left.
- Disconnect the water supply line, drain excess water into a bucket, remove the bolt caps, and unscrew the nuts at the base. If the nuts and bolts are rusted, cut them off with a hacksaw.
- Lift the old toilet straight up and place it on a trash bag to avoid getting water on the floor.
2. Prep the Closet Flange
- Scrape away all the old wax with a putty knife until the flange is clean. This step is important—a clean surface ensures a proper seal.
- Inspect the flange:
- Is it cracked? Use a repair ring.
- Is it loose? Secure it before continuing.
- Insert the new closet bolts so they stand upright.
3. Install the Wax or Silicone Ring
- Place the new wax or silicone ring on the flange (easier for beginners) or on the toilet outlet.
- Make sure the seal is centered and oriented correctly (tapered side up if applicable).
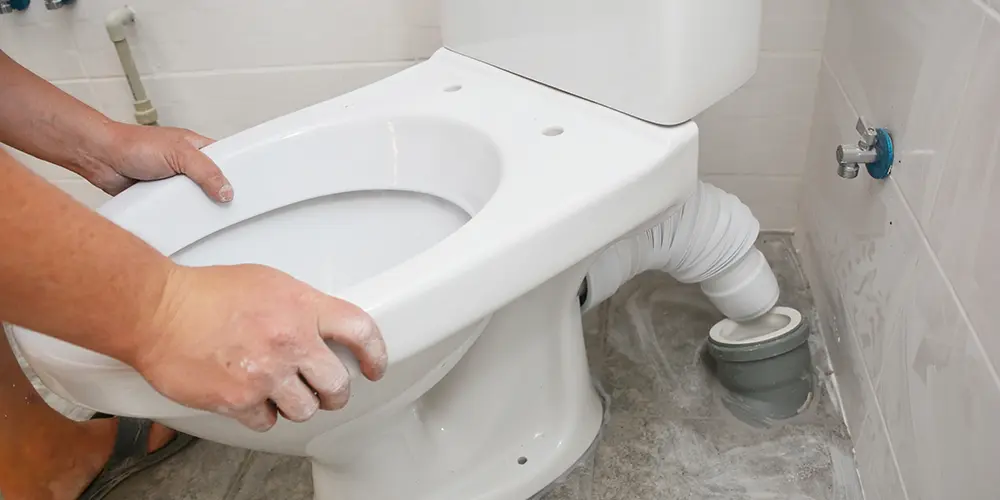
4. Position the New Toilet Bowl
- Carefully lower the bowl over the flange, aligning the bolt holes. You may want an assistant to help you lift and align the bowl.
- Once in place, press down firmly on the bowl and rock it gently side to side. This compresses the ring to create a watertight seal.
5. Secure the Toilet
Add the washers and nuts, first tightening them by hand.
- Alternate sides as you tighten.
- Stop when snug (not “gorilla tight”).
- Don’t overtighten the nuts; this could crack the porcelain and ruin the toilet. It’s a costly and frustrating mistake!
- If the bowl wobbles, don’t force it—level it with shims.
- Trim the excess bolt length if needed and snap on the caps.
6. Attach the Tank (If Applicable)
For two-piece toilets:
- Install the rubber washer under the tank.
- Set the tank onto the bowl.
- Tighten the bolts evenly from underneath.
- Keep it level, and once again, don’t overtighten—porcelain doesn’t forgive.
7. Connect the Water & Test Your Handiwork
- Wrap the water supply line threads with plumber’s tape and reconnect the water line.
- Turn the water back on slowly and check to confirm there are no leaks at the supply line connection, the tank base, or on the floor around the toilet.
- Flush and inspect again. If the floor is dry, you’re in business.
- Install the new toilet seat.
Avoid These Mistakes!
- Skipping flange inspection
- Reusing an old wax ring
- Overtightening bolts (cracks = costly mistake)
- Ignoring a slight wobble
- Forgetting to check for leaks after the first few flushes
Wrap-Up & Next Steps
Congratulations! You’ve handled a plumbing upgrade that most people outsource.
Not only have you saved a few bucks, but you’ve also added a practical skill to your DIY toolkit. That’s a win you’ll feel every time you hear a proper, leak-free flush.
Before it’s a done deal:
- Dispose of the old toilet in accordance with local guidelines.
- Give everything one last leak check.
- Keep an eye on the base of the new toilet for the next few days. If it’s dry, you did it right.
FAQs: Installing a Toilet
Q: How long does it take to install a toilet?
For a DIY homeowner, a standard toilet replacement takes about two to three hours. This includes removing the old toilet, cleaning the area, and installing the new unit.
Q: Do I need a plumber to install a toilet?
No, you do not need a professional plumber. Toilet installation is a manageable DIY project as long as you can safely lift the toilet and use basic hand tools.
Q: Can I reuse the old water supply line?
You can, but it is highly recommended to buy a new one. Supply lines degrade over time, and a new one only costs a few dollars, which is cheap insurance against future leaks.
Q: What happens if the wax ring isn’t seated correctly?
If the wax ring is misaligned, water and sewer gases will leak out from the base of the toilet. If you suspect a bad seal, you must remove the toilet and install a new wax ring. A wax ring cannot be reused once it has been compressed.
Q: Can I use a silicone ring instead of a wax ring?
Yes. Silicone or rubber seals are a great modern alternative to wax. They are less messy and can be repositioned if you make a mistake while lowering the toilet bowl, whereas wax rings are ruined if you lift the bowl back up.
Q: Should I caulk around the base of the toilet?
Plumbing codes in many areas require caulking around the base. However, many plumbers suggest leaving the back section un-caulked so you can quickly spot water pooling if the wax or silicone ring ever fails.
Q: Why is my new toilet wobbling?
A wobbling toilet usually indicates an uneven floor. You can fix this by slipping a few hard plastic toilet shims under the base until it sits flat, then tightening the bolts and caulking the gap
Q: How tight should the closet bolts be?
They should be snug; tighten them just enough to stop the toilet from moving. Overtightening can crack the porcelain base, ruining the toilet.
